Love this look! It's spring time now, but I made a faux fur vest in December before the moving fiasco and didn't get a chance to post about it.
Links: Image 1, Image 2, Image 3
I bought my faux fur from Joann's for 40% off. It is $30-$40/yard normally; so, I highly recommend bringing a coupon! Even with the coupon, this project wasn't exactly cheap (I paid ~$20 for my fur; plus, ~$10 for the lining and thread), but neither is buying a pre-made vest from the store. It is also a slow process. If you want good results, you will need to hand baste every seam before sewing with a machine. This is because fur is slippery and can move around easily while you're trying to sew (it's very difficult to pin down), and you can push the fur out of the way of the stitches so that your seams are fluffy and not matted down.
For this project, you will need:
- Basic Bodice Block!
- Basic Dart Manipulation Instructions!
- 1-1.5 yards of faux fur
- 1-1.5 yards lining fabric (I used black silk)
- The Basics: thread, needle, marking chalk, ruler, scissors, etc.
- A razor blade (Note: never cut fur with scissors; you will make a huge mess!)
Drafting Your Pattern: (Note: You will only be using the back part of your Basic Bodice Block)
- Remove the darts from your "Basic Bodice Block: Back" by following the instructions in my Dart Manipulation post under "Combine Two Darts into One". Remove both the shoulder and waist dart.
- Drop the bottom of the arm hole by 2 inches, and redraw arm hole curve.
- Add length to the bottom. (I added 8 inches, but this is totally up to you.)
- Trace around your pattern, flip on the fold, and trace again to get rid of the fold line. You now have your "Vest: Back, no seam allowance, Cut 1" pattern piece.
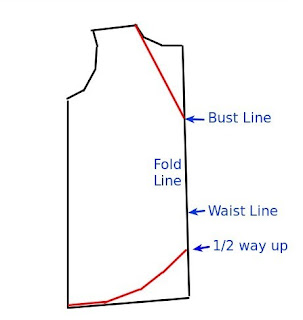
- To get the front pattern piece, use the same pattern piece you just used to make the back (the one with the fold line). Find your bust line on the fold line side and connect that point to the beginning edge of your neckline. This will give your vest a V opening in front. If you want more curvature, go ahead and add some. This is your vest design!
- Next, find your waist line on the fold line side of your pattern. Find the halfway mark between your waist line and the bottom of the pattern and cut a curve from this point to the bottom edge of the opposite side of your pattern. (See image below.)
- You should now have your "Vest: Front, no seam allowance, Cut 2, flipping in between" pattern piece.
 |
| Steps 5 and 6 |
Making Your Vest:
- Keep in mind the direction of your fur. You want it to flow in the same direction on all your pieces.
- With this in mind, lay our your pattern pieces on the back of the fur and trace. *Don't forget to flip your "Vest: Front" so you end up with a left and right side!
- Add 1/2" seam allowance to all pieces.
- Using a razor blade, cut out the pattern pieces.
- Trace your pattern onto your lining fabric, add seam allowance, and cut these pieces out. Scissors are fine. :)
- Hand baste your two front fur pieces to your back piece at the shoulders. Right sides together.
- Sew over your basting stitch.
- Sew your lining pieces together at the shoulders as well; you don't need to baste first unless you want to.
- Hand Baste the lining to the fur (right sides together) at the arm openings, around the front edges of the front pieces, and neckline. (Don't sew anything below the arm openings or the back half of your front pieces yet. These will be sewn together at the side seams in a bit.)
- Use your sewing machine to go over all your basting stitches.
- Invert!
- Baste your side seams and sew over them. These should be the only visible seams on the inside of your vest.
- Fold under your lining at the bottom of your vest and baste/stitch this into place.
- Done!

Enjoy!


