Sunday, July 24, 2016

Make It: Jacket


This one doesn't look much like the original inspiration. I wanted a new jacket that I could throw on last minute and would go with just about anything. I like the mixing of the two fabric textures. I added a hood, pockets, and zipper. My version looks almost brown in the picture, but it is actually very black. Unfortunately, I can't seem to get a good picture with the correct color.

Original
My Version

My Version (unzipped)

My Version (w/ cute button detail on the sleeves)


Pattern Review: Kimono


Very trendy right now. You see kimonos everywhere. They are light weight cover-ups perfect for warmer weather. I highly recommend the tutorial I used to make mine; it was very well written and easy to follow. They did a great job.

Original

My Version
My Version (sleeves)


Express Double Layer Tank


Found this shirt on Pinterest. Apparently it is an Express tank, but it took me a while to find it. The one on Express's website doesn't even show the back. I love the layered look. I wore a layered red bra and wrap underneath for a pop of color.

Original

My Version (Front)
My Version (Back)

I am considering adding border to my edges like in the original. I left them raw for now.


Make It: Burda Short Sleeve Wrap Effect Dress


Burda Style Short Sleeve Wrap Effect Dress 09/2015 #107

Original
My Version

Supplies: two-way black stretch fabric (Joanns), black bias tape (Joanns), zipper (Joanns)

Review:
This was a print-out pattern that you print off on multiple pages, tape together, and cut out. The process was tedious, and I would much rather buy a traditional pattern. I would not recommend Burda Style patterns because the instructions are brief and confusing to read. I thought it might just be this particular pattern, but I purchased a second pattern with instructions that were also incredibly brief and poorly written. I ended up throwing out the instructions and completing this dress how I imagined it was supposed to be put together. So, if you need instructions, don't get a pattern from Burda Style. If you can figure out how pieces should go together and in what order yourself, I still wouldn't recommend using them because it seems over priced for what you get. They don't include seam allowances; so, you have to add your own, and they didn't even say you needed a zipper in the materials section (it just appears later in the instructions).

Make It: Clear Bag with Gold Studs


How many of you have a folder of images saved to your computer called "My Dream Closet"? Well, I decided to stop dreaming and start making it real. For each post in the "Make It" series, I will recreate fashion pieces that I have found.

Original from A Pair and a Spare

My Version:


Supplies: clear vinyl (Joann's), gold studs (Amazon), clip on leather strap (Amazon), wallet (Amazon)

Yes, I love Amazon.

I used the tutorial on the A Pair and Spare website but made up my own dimensions. I ended up making two versions because the first was too big (more like a messenger bag). I used a permanent marker to make the cut lines and then wiped the lines off with an alcohol wipe. Alternatively, you could use a dry erase marker.


Saturday, January 16, 2016

Freezer Meal Prep Day: Italian Beef Sandwiches

Italian Beef Sandwiches with Green Beans and Cantaloupe (not pictured)

My mom makes Italian Beef Sandwiches. They are spicy and savory and all around delicious. This is my compiled recipe using my mom's recipe and tips I read online. I make these up ahead of time in a gallon freezer bag, thaw it in the fridge the night before, and dump it in the slowcooker in the morning. How do I know when to make it? If it's the middle of the work week or near the end and I don't feel like putting forth the effort to cook anymore, I'll get out a freezer meal. Not having to worry about dinner for just one night is really nice, and I can get something else done or just relax a while.

Serves: 2
Prep: 10 mins
Cooking: 3-4 hours in slow cooker

Ingredients:
  • 1/2 lb roast meat (optional: cut into smaller chunks to facilitate quicker defrosting)
  • 2 cups beef broth
  • 1 onion, sliced
  • 2 garlic cloves, chopped
  • 1-2 tbsp Worcestershire sauce
  • 1 tbsp soy sauce
  • 1/4 cup sliced jarred banana peppers
  • 1/2 tsp basil
  • 1/2 tsp oregano
  • black pepper to taste
  • hoagie buns
  • provolone cheese (optional)

Directions:
  1. To freeze: put all ingredients in a gallon size freezer bag except the buns and cheese. Press out as much air as possible and freeze.
  2. Otherwise, pour everything into the slow cooker (except the buns and cheese), and cook on low for 3-4 hours or until the meat can be shredded easily with two forks.
  3. Shred the meat and pile it into your hoagie (optional: toast your buns first to keep them from getting soggy, but you'll probably eat them too fast for that to happen!). Add a slice of cheese, if desired. Scoop the excess liquid into a small cup for dipping!
Enjoy!
-Linciel


Freezer Meal Prep Day: Chicken Pot Pie


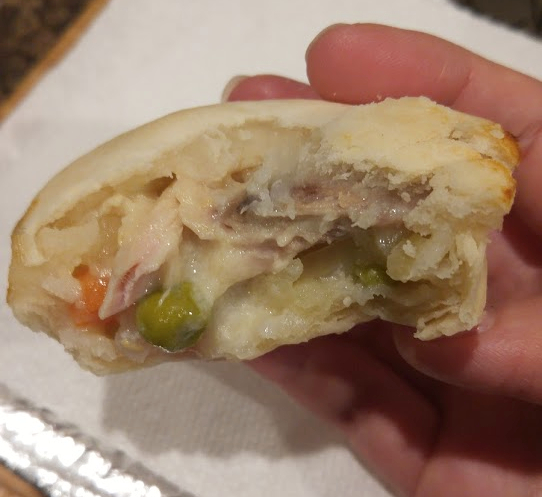
I was off for a few days and decided to use the time to restock the freezer. I like to keep several ready-to-eat items on hand for packing for lunch or when we get busy and don't eat until we are absolutely starving. Homemade is infinitely better than anything pre-made from the store; it's healthier, tastier, AND cheaper. I also make up dinners to keep in the freezer for long work weeks. Chicken Pot Pie falls into both of these categories. I can make up a whole pie and freeze it for later, or I can make up a bunch of these Mini Pot Pies (pictured above) to keep around for lunches.


Makes: 1 (9 inch) pie or 20 mini pot pies
Prep: 20 mins
Cooking: 30 mins

Ingredients:
  • 2 potatoes, diced
  • 1 carrot, diced
  • 1 onion, diced
  • 1/2 c peas
  • 1 cup shredded Rotisserie Chicken
  • 2 cups chicken stock
  • 3 tbsp butter
  • 2 tbsp flour
  • 2 cups milk
  • 1/2 cup white wine
  • salt and pepper to taste
  • pie crust mix, pre-made roll-out pie crust, or homemade pie crust (*see below)
    • Note: You will need 4 pie crusts (ex: two boxes that make two pie crusts each) when making the 20 mini pot pies. You can alternatively make 10 mini pot pies and 1 slightly less stuffed big pie. If making just the big pot pie, you will need 2 pie crusts.

Directions:
  1. Prepare your pie crust if it isn't pre-made.
  2. Boil vegetables for 20 minutes; drain.
  3. Meanwhile, melt butter in a large skillet on medium-low heat. Sprinkle in flour a little at a time, stirring constantly while adding. Slowly add in your milk, stirring constantly, and continue stirring until thickened. (Try to break up any lumps.)
  4. Stir in the chicken stock, wine, vegetables, and chicken. Season to taste, and simmer for 20 minutes.
  5. Meanwhile, if you are making a whole pie, get the crust ready to go in your pie pan. If you are making the mini pot pies, use a large mouth cup that has a larger diameter than your muffin pan to cut out 40 circles.
  6. Use 20 circles to press into your muffin pan. I highly suggest using strips of freezer paper to make it easier after baking to pop the mini pies out (refer to the picture on the right).
  7. Pour your filling into your pie crusts. For the big pie, I suggest adding all the vegetables first and then the liquid because you will probably have too much liquid.
  8. Press your top crust on, cut some slits, and you're ready to bake!
  9. Bake at 450F for 10 minutes.
*If you want to make your own crust, that's fine, but I personally don't like to mess with it. I buy the Betty Crocker pie crust mix, but you can also buy a pre-made roll-out crust in the refrigerated section by the biscuits and cinnamon rolls.

--Linciel