Sunday, November 13, 2016

Silky Black Camisole


A staple for your closet! A silk camisole looks amazing under a blazer or by itself, with pants, jeans, or a skirt. Black is universal. You can make this in any color, but black goes with everything.

Supplies:

  • Pattern paper
  • Ruler
  • Measuring Tape
  • Scissors
  • Pins
  • 1 Yard Silk or Satin Material
  • 1 Yard Black Rattail Cord
  • Black Thread
  • Sewing Machine

Figure A
Make Your Pattern:
(Refer to Figure A)

1. Use the measuring tape on yourself to obtain the following measurements: Measurement C is the bottom of your V-neck to where you want your camisole to end.

2. Measurement E is your hip measurement divided by 4, plus 1 inch. Draw this line perpendicular to C.

3. Measurement A is the distance from where you put the bottom of your V-neck to where your straps will go.

4. Measurement D is the top of your camisole, where the straps will connect, to the bottom of your camisole.

5. Starting from the top of line C, measure over the distance of A and mark this spot with a dot (this is a placeholder). Next, measure up from line E, intersecting your dot, the distance of Measurement D. This is the location of where your straps will connect.

6. Draw a line from the top of line A to the top of your camisole where your straps will connect (found in Step 5).

7. For Measurement B, start at the top of line A (the bottom of your V-neck) and drop down to where you want the bottom of your armhole. For me, this was 2 inches. This is approximate. Eyeball where the top will wrap around. Next, take your bust measurement divided by 4, and add 1 inch. Measure this far over from the point you just found on line A; this is the bottom of your armhole.

8. Draw a line from the bottom of your armhole to the top and bottom of your camisole as shown in Figure A. Optional: You can curve the armhole line if desired, but be careful not to overdo it or you'll have major side-boob.

9. Add seam allowance to your pattern; I used 1/2 inch and 1 inch at the bottom for the hem. *Note: Line C is a fold line; you don't need to add seam allowance here.


Directions:
Note: I suggest making a muslin first and altering pattern as needed before cutting your good fabric.

1. Cut 2 on fold (line C) of pattern. Cut 2 facings using the same pattern, but stop halfway down (gray line in Figure A).

NOTE: you can easily make your back flat instead of a V shape by following the instructions in my Silky Black Camisole with Lace tutorial.

2. With right-sides together, sew facings to front and back pieces at neckline and armhole. (Do not sew side seams!)


Note: If using stretchy material, stay-stitch the neckline first in a directional manner. This means, stitch close to the edge (within the seam allowance) starting at the bottom of the V and going up on both sides. This is done to prevent stretching while sewing your garment.

3. Snip into the seam allowance at the bottom of your V, careful not to cut into the stitches. Grade your seam allowance by trimming down one side (this prevents bulky seams), trim around the points of where your straps will attach, and snip triangle pieces from your armhole if it is curved.

4. Invert, push out points, and press.

5. Now is time to finish the bottom of your facings. You can zig-zag stitch, serge, or, if it doesn't fray, leave it as is.

6. Baste the sides of your facings to your camisole.

7. Right-sides together, sew front and back pieces together at side seams. Finish seams. Press.

8. Edge stitch all the way around top of camisole. (Note: if you don't want to see any stitches on the outside, you will have to stay-stitch your neckline instead. To do this, you sew your facing to the seam allowance; this keeps the facing from rolling out and showing.)

9. Measure how much Rattail cord you will need for your straps. To do this, I suggest trying your camisole on and deciding how far down you want it to hang.

10. Hand sew straps in place.

11. Hem bottom of camisole.

Done!


I know it seems like a lot of steps, but this is actually a very simple project. And it's inexpensive. I got my satin from the remnant section at Joann's for only $4.25! It is usually $6.49/yard (still super cheap). The Rattail cording is only $0.73/yard.

Total cost of project: $4.98!


Tip: Change it up by adding lace to the neckline or bottom edge. Now that you have a pattern, you can make it again and again!


Saturday, November 12, 2016

Thrifted Shadow Box: Garlic Breath to Museum Chic


I've been searching thrift stores for a while now looking for the perfect shadowbox frame for a souvenir I picked up while in Montana. I finally found one that was the right size and shape!


Who has framed garlic in their house?

Apparently no one... because this was at the thrift store for only $1.99! I knew I'd find the perfect one eventually.

Here's what I did:

1. Remove everything from frame. The backs are sometimes covered with paper. I used an x-acto knife to cut off the paper and expose the backing held in place with metal prongs.

2. Optional: I used a leftover container of sample paint and a sponge brush to paint the frame. Use a regular brush if you want; I just like the sponge because it seems to coat better and not leave brush strokes.

3. Also Optional: While the paint dried... I used double sided tape to cover the wood back with white card stock paper.


4. Decide where everything should go (I used the mat for reference), and glue it all down. I used the double sided tape to tape down the description and hot glue for the stone.


5. Put it all back together!


The only thing left to do is decide where your new frame should go. I tried it first in the living room next to all my other thrifted frames, but I didn't like it being stuck in the corner. I want people to be able to read the description.


So, currently, I have it in the hallway leading to the guest bedroom and bathroom. I hung it at head-height. I try to hang all my frames at around the same height throughout the house. Keep it consistent.

Decorating Tip: Display your collections. It will mean more to you than some pre-made thing you bought just to keep from having blank walls. Decorate your home with what you love.


Did you notice my mistake in the photos with the green background? My matting was backwards. Whoops!


Thursday, November 3, 2016

T-shirt Refashion: Split Seam Tunic


Part 3 of cheap-o Michael's t-shirts! This one is my favorite one yet! (and the easiest)

Inspiration
Materials needed: t-shirt and scissors.

You might also want to sew a little. I stitched up the sides slightly in the waist area.

The problem with the Michael's t-shirts is that they are unisex and have no feminine curves and are too long. But, hey! That means you can use them to easily make tunic tops!

All I did was cut open the side seams to just above where my pants sit. I didn't want too much skin showing (the inspiration photo was a little too high for me although she's wearing an under shirt), but I wanted a peak of skin. ;)

Next, I cut out the neckline so it was a deep scoop neck. To do this, I used some fabric chalk to sketch a basic outline, cut the first side, and flipped that piece over to use as a template for the other side. That way, both sides are exactly the same. Make sure the bottom of the scoop isn't too pointy!


That's all! I didn't finish any edges. Jersey fabric doesn't fray. I plan to wear this with black leggings and black boots. I also love the current lacy bralette trend; this would be a good top to show off a peak of sexy lace.

Total Cost: $2 (or $4 depending on coupon/sale)


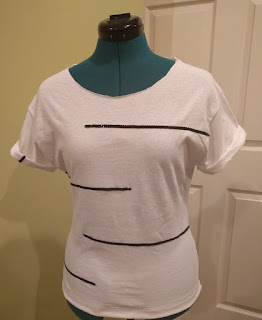
T-shirt Refashion: Sequence Minimalism


T-shirt #2 in the cheap t-shirts from Michael's series.


Inspiration
This shirt was what inspired me to cuff the sleeves and go high-low seams on my National Geographic t-shirt.

For this t-shirt refashion, I did cuff the sleeves, but I didn't make the hem lower in the back. I also brought in the sides to make it more form-fitting. This is a personal preference. While I love the loose-fitting slouchy look on others, I tend to look like I'm wearing a tarp.

I used strands of black sequence to make the lines on this shirt, which was slightly annoying because the sequence would fall off as soon as the pieces were cut.

I used plain glue to adhere the strands to the fabric. I'm not sure if this was a bad idea; I know they make special fabric glue, but after drying, it appears to be well adhered. However, I think this is definitely a hand-wash only shirt.


I ended up cutting out the neck area so it was more like the inspiration photo. I didn't finish the edges.


I bought 4 shirts from Michael's because they were BOGO50% off: light gray, charcoal gray, hunter green, and white. I tend to gravitate towards darker colors; I owned exactly 1 white shirt before this one. So, I was unsure about getting a white t-shirt despite loving the inspiration photo.

I think it turned out well, but will I actually wear it? That's something to think about when picking out your own t-shirts to refashion. You should have a pretty good idea of what colors/styles look good on you.

Here are a couple alternative ideas I had for this shirt:


T-shirt Refashion: National Geographic


Michael's (and other craft stores) sell cheap, plain t-shirts. They go on sale regularly; usually priced at $4/each, I've seen them go as low as $1/each.

I didn't have to wait very long before they were BOGO 50% off. I picked up 4.

T-Shirt #1:
Inspiration

I picked up some fabric paint medium that allows you to convert any acrylic paint into fabric paint. I don't think this is a necessary item, but I was interested in trying it out.

Remember to put a piece of waxy paper inside the t-shirt before painting. You can cheat and use regular paper, but be sure to remove it and hang up your shirt (to keep the front and back from sticking together) before the paint dries. With wax paper, you don't have to worry about anything; even after the paint dries, it should just peel right off.

I used masking tape and a sponge to get the crisp yellow rectangle. I also used it to mask around where the lettering belonged (to keep my letters straight) but painted the words free-hand. You could also sketch out the letters with some fabric marking chalk.

These t-shirts were unisex. Women's styles were available but not in all the colors I wanted. For each shirt, I hemmed the bottom and brought in the sides around my waist in order to make them more feminine.

For this shirt, I hemmed the bottom so that the back was longer than the front (just because I've been seeing this tend recently and wanted to test it out).

The Inspiration shirt doesn't have sleeves, but I decided to keep mine. This is personal preference. I cuffed my sleeves and stitched them in place by sewing in the upper and lower seams (this is called "stitching in the ditch").

So, what do you think? Not bad for a $4 t-shirt.


Total Cost of Materials:
T-Shirt = $4 (or $2, BOGO50%)
Fabric Paint Medium = $1.25 (with 50% off coupon)
Paint Brush / Sponge Brush = already had
Masking Tape = already had
Thread = already had

Total Cost = $3.25-$5.25


Wednesday, November 2, 2016

How to Thread a Sewing Machine

I have a Brother CS6000i sewing machine that my mother bought me for my birthday from Amazon. I am very happy with it, and I would recommend it to someone looking to start sewing.

So, how do you thread a sewing machine? It's pretty much the same regardless of what machine you own.
Figure A
  1. Start by loading a spool of thread on the metal rod at the top of your machine (the spool pin).
  2. Pull the thread towards the thread guide as shown in Figure B. To thread your machine, follow the arrows; to load your bobbin with thread, you would wrap the thread around the knob that is circled in Figure B (instructions at the end of this post).
  3. Figure B
  4. Figure C indicates the path the thread should then take, but before you do this, make sure the thread up-take (metal piece in Figure C on the upper middle left) is at its top most position. If it is not, twist the knob on the right side of the machine towards you until it is. Then, down-over-up-over-down as indicated.
  5. Figure D shows where the thread exits the thread guide. You will then pull it through the needle bar (located above the needle) and then through the needle hole. Note that some machines have self-threading and auto-bobbin threading features. Refer to your machine's manual for how to do this.
  6. Figure D also shows how to load the bobbin. When loading, you should always have your bobbin thread wrapping away from you or to the left. This is a constant regardless of the machine. My machine is a top loader, I place my bobbin in the bobbin holder with the thread wrapping to the left and then follow the arrows from Start to End as indicated by Figure D.
  7. To finish threading your machine, hold the upper thread and twist the knob on the right side of the machine until your bobbin thread appears under the presser foot. Pull this out, and wrap both threads down under the presser foot and back towards the rear of the machine.
Figure C

You're now ready to begin sewing!

If you've never sewn before, the basics should be covered in your machine's manual, but the gist is:
  1. load your fabric under the presser foot where you want the stitches to go
  2. lower your presser foot
  3. select the desired stitch
  4. KEEP YOUR FINGERS AWAY FROM THE NEEDLE
  5. press the foot paddle, and away you go!


Figure D
Remember: use the back-stitch button when you start and stop in order to secure your stitching. (back-stitch 4 stitches, go forward, back-stitch 4 stitches when finished)

For loading your bobbin:

  1. Wrap your thread around that knob I circled in Figure A, through the hole in the upper lip of your bobbin, and load it onto the holder located next to where you loaded your spool of thread (on my machine, it is the plastic gray piece in Figure A).
  2. Push this whole assembly to the right to lock it into place.
  3. Keep a tight hold of the end of your thread.
  4. Push down on your foot petal to begin loading the bobbin with thread, and stop after you have wrapped enough thread around the bobbin to secure the end of your thread.
  5. Cut the end off after it has been secured inside the bobbin.
  6. Continue loading your bobbin until it is full.


Sewing Tools


What do you need to get started sewing?

From a pattern:

  • sewing machine
  • thread
  • bobbins
  • marking tool (preferred: chalk)
  • needles (preferred: flower head - located in quilting section)
  • sharp scissors
  • measuring tape
  • iron
  • seam ripper
  • squirt bottle and cloth (for fusing interfacing)

For drafting:
  • pattern making paper (I get mine off Amazon)
  • rulers: yard stick, 12", 6", and curved (you don't NEED the curved, but trust me, it's great)

Extras:
  • pinking shears
  • small scissors (for those tight spaces)
  • hemming guide
  • seam iron (small iron that makes it easier to iron small areas)


Tip: you can use flat head needles to hang pictures on the wall without leaving visible holes -- especially handy when you're renting!